Anybody Can Play PIANO

COMMENTS and INFO about PIANO LESSONS
TOPICS LIST:
LESSON ONE + GENERAL INFO
For PIANO TEACHERSPRESCHOOL PROGRAMS
SENIOR LIVING
PARENTS
The YOUNG BEGINNER
Parallel Learning: HEARING
Parallel Learning: SPEAKING
Parallel Learning: SENTENCES
Parallel Learning: READING
LESSON TWO
Cs,Gs,Etc.LESSON THREE
Multiple 2&3 Black Key GroupsLESSON FOUR
Right and LeftLESSON FIVE
CDE and Finger NumbersLESSON SIX
Quarter, Half and Eighth NotesLESSON SEVEN
Tracing Notes, Etc.LESSON EIGHT
Beats and MeasuresFOR PIANO TEACHERS
STAND ALONE....As I have stated many times, the app can stand alone. A teacher can use the app as a practice tool, encouraging students to not only practice the song at hand, but explore through the app, listen and watch all the songs on SHOW ME, and even start the NOTES part if they are interested (usually about age 4+). Fortunately students of all ages tend to view the app as a game. In fact, a 75 year old man who just started using the app came up to me yesterday, telling me it was a lot more fun and interesting than a video game!
LAMINATING
In the videos you will notice that I laminate most activity sheets (5mm). That is not necessary with only one or two students. However, when using the sheets multiple times, laminating them keeps them looking new, they can be used like a white board, and the keyboards - even just the 5 black key group - can be used for practice when away from the computer or keyboard.
WATCH VIDEOS
Also encourage young students to watch the videos and practice what they see there as well. They will ultimately notice that the little assistants learn each song so well it is totally memorized, they can play it high or low on the keyboard, and they are able to play and sing the song simultaneously.
ACTIVITY SHEETS
The activity sheets on the videos are meant for more than one student at a time. I always liked to have 3-4 students at a time. They enjoy helping and encouraging each other and are willing to do activities many more times when the "group" still needs some review.
PRE-SCHOOL PROGRAMS
Pre-schools are very interested in giving their young - as well as after-school students - the chance to learn to play the piano. They generally do not have the staff that can do it "in house".
There are multiple ways to do it.
1. Parents can sign up their child for in person piano lessons and purchase the app for at home practice. When the teacher comes in that teacher has all the equipment - keyboard, laptop, activity sheets.
2. An "across the board" program can be set up. Sometimes the school will set up several keyboards throughout the school all connected to the app and print all necessary materials. They show the videos daily to the appropriate classes and do the activities as well multiple times per week. The teacher only comes once a week - or every 2 weeks - and checks all classes and their progress, working with teachers and students (usually praising!) as needed. In this case the instructor/teacher is paid for time spent in the school as well as prep time. Parents are encouraged to purchase the app for use at home.
3. In other cases the piano teacher provides all materials - laminated when appropriate - and comes at least once a week. Again the school shows the videos on a daily basis, reviewing all the things the children see. In this case the school generally does not have a computer and app set up within the school, but parents are encouraged to purchase and use the app at home. Doing it this way makes it possible for very small schools to participate.
EVEN SENIOR LIVING
You can see from just 3 examples that having the app for practice and having the videos for review and activities makes it possible for lots of outside programs. If I were still doing outside programs I would even consider senior living homes. Those seniors would also like doing something interesting - something that can be done sitting down!
PARENTS
Parents can function like a teacher even with no music background....going through the app with their child....viewing the youtube lessons, printing and doing the activities with their child. When a parent shows interest, it is contagious!
 Children can go through the app at their own speed. The youtube videos may not cover music theory as quickly as they are going, but that is not an issue. They can keep learning new songs. Make sure fingering is done correctly (trains muscle memory) and that the songs can be played without the help of the app by either turning off the arrows and cartoon notes or playing independently....in other words, TOTALLY memorized. Memorizing all the songs in order trains the memory reflex - transfers to other subjects as well! Older children should also be learning music notation with the NOTES portion of the app.
THE YOUNG BEGINNER
There have been a multitude of books written about the benefits of learning to play the piano - particularly for the young beginner. Playing the piano requires multiple skills implemented simultaneously...both sides of the brain are used at the same time! As I told the boys in the video, God gave us marvelous hands!....hands connected to a marvelous brain as well.
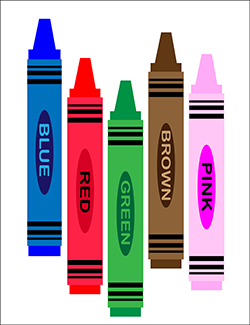 Children need to know that just learning to pick up an object such as a color crayon means those hands are capable of incredible things! Muscle memory and memory reflex skills are fantastic skills. Training these skills on the piano make them transferable to other subjects as well. The best way to teach these and other skills is by using a method that parallels language and moves one step at a time.
Since I tried to always start my students at a young age, I always taught using a language parallel curriculum. As a result of a parent's comment during a lesson with some 3 and 4 year old students, I started developing my own personal curriculum.....the rate of progress for my students doubled! I was shocked. The only major difference I had made was using songs they already "knew".
With my curriculum it is not necessary that a beginning student is capable of reading - just able to speak in an understandable way. One would think that only children would be interested in this type of method. However, over the years virtually all my students wanted to at least begin this way - even beginning adult students! Everyone said it made sense.
I started teaching with small group lessons (up to 4 in a half hour class). Children can learn and help others with this procedure. If one asks a 3 year old to repeat a song he/she just played the response is generally, "I just played it!". However, when taking turns, the song not only gets reviewed, but different aspects of the song can be discussed and improved.
I always complimented a student on something they did well....there is always something! They all knew my compliments were genuine. However, as one four year old little girl said as she held up her finger, "But..... Yes, I always added something that could be improved after the compliment. My "Great!" compliment only came when a song was completely memorized and played extremely well.
INFANTS????
One can start the music education process at birth. Babies love classical, symphonic music. If a composition is played daily (or multiple times during the day) a baby will start moving to the tempo - even instantly changing their movements when the tempo changes. Many even stop what they are doing in anticipation of a favorite part of the music....the list goes on. It is amazing!
Once a baby obviously "knows" a piece (generally about 5 months for the first one, less after that), add another piece of music to the roster. You can even play certain pieces when it is time to eat....when it is naptime or bedtime....so your child can anticipate and relax. Use music that you enjoy in order to share it with your child.
LANGUAGE PARALLEL INSTRUCTION: HEARING:
Listening to songs compares to hearing a language. This is on the SHOW ME part of the app. All the songs in every level are available so children can listen and watch anything they wish.
The two 3 year old boy assistants in the videos absolutely love SHOW ME. They love being able to touch any level and any song - TOTALLY their choice. They remember favorites by the song icons....again, don't need to be able to read to find those songs!
The boys move around to the music and get really excited. When I am there I sing the words written in the upper left corner of the screen for them as well.
It is also a good idea - with young students especially - to sing and move in response to what is being heard - especially with the song they are learning to play. Ask them for movement suggestions. I really liked the moving back and forth from one foot to the other when my two assistants decided to be "big" clocks!
SPEAKING:
MUSCLE MEMORY:
 Playing songs is comparable to speaking a language. Parents who speak to their child in that stage of learning tend to speak extremely clearly.
With piano, the first step in "speaking clearly" is comparable to begin training the muscle memory by using the correct sequence of fingers each time a song is played. At this point finger position is not critical....just the correct finger sequence. "Piano fingers" come quite soon.....
Children are quite visual, so color coding the fingers plays an important part of this step in learning. (If working with a color blind person, use colored shapes so you can say the "blue triangle", etc.) Both hands should be equally trained. Finger numbers go in opposite directions, which is extremely confusing for beginning students. Our color coded fingers are in parallel, so both hands can use the same colors in the same order for a given song.
Three year olds like using the colored dots on their activity sheets. By age four, children seem to prefer coloring with crayons or markers. Some students even like their own fingers color coded....washable markers work well for this.
SENTENCES:
PATTERNS:
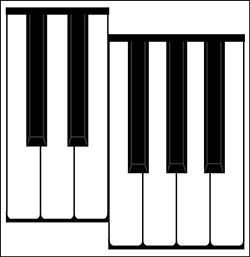 Once a child speaks words, the next step is putting those words in order. This compares to being able to observe the patterns of the keys in order to play a sequence of notes.
The 2 and 3 black key cards used in the video help with this process. Young children take great pride in lining them up correctly. Barrett, one of my assistants, put down a 2 black key card, then picked up another 2 black key card which he couldn't put next to the existing 2 black key card....but he noticed that he could put that 2 black key card at the other end of his line of cards since there was a 3 black key card there. I was impressed!
There are lots of things that can be used as well to facilitate the recognition of piano key patterns. Just by looking around....2 flowers - are they exactly the same? - same color, yes - same kind of flower, no. "Same" and "Different" really help with patterning skills.
COMBINING SKILLS:
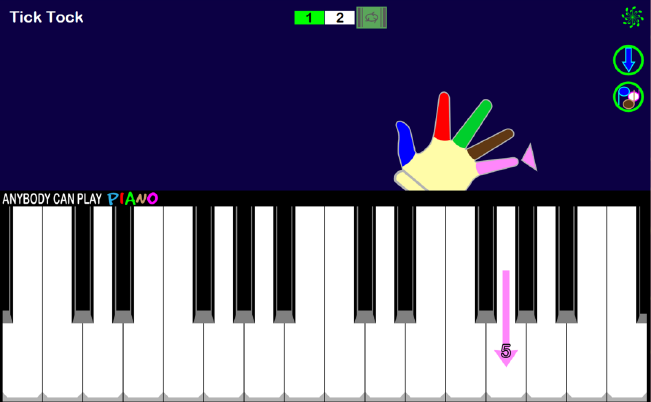 When a student knows finger colors and patterning it is time to begin playing a song. The app goes one key at a time. If an incorrect key is played, there is no sound. Looking at a key and hearing the proper sound is important so "mistakes" are silent. The arrow just starts bouncing up and down on the correct key.
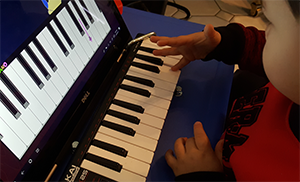
When a keyboard is attached to the computer, the screen image is away from the keys being played. For some, this makes it difficult to find the correct key to play - especially at the very beginning. The key strip helps. First it is another patterning exercise because it has to be placed in the proper position on the keyboard. Then it not only helps with finding the key, but it is color coded to that particular song as well.
Again, at this point do not fret about weird hand position....just need to concentrate on using the correct finger on the correct key.
There are multiple key strips for the first several songs on the app and they progressively give less help until the student feels no need for the strip anymore.
Our speech improves as we use it just like memorized songs improve with continued practice. (Memorizing each song learned trains the memory reflex - something else that is incredible!) Turning off the arrows and little cartoon notes on the app screen help a student concentrate more intently on the song being played. If a "mistake" is made, the bouncy arrow will show up to help, however.
READING: More on this topic with later lessons.......
LESSON TWO:
This video is quite self explanatory. Again, do not worry about those weird hand positions. We want those correct fingers on the correct keys at this point. Sometimes it is difficult to go one step at a time!Many children as young as these two boys have not had experience printing letters, so this is why we are "driving" around the C and G. The two letters look quite similar, so having to make a couple left turns differentiates that G from a C. The C and G for tracing is also quite large, again because manual dexterity has a ways to go - pretend white boards are fun too!
Children have heard the terms hours and minutes, but with the help of the day and night sequence, they seemed to understand how hours, minutes and seconds actually worked to help us know what time it is...and we are ticking and tocking to seconds!
Be encouraging students to play without the help of a keystrip or even the arrows on the app as soon as you feel they are ready. I find it very amusing when a young child raises his/her hand at me and says, "I don't need that!" I love it! Some students see patterns very quickly - others do not. If they want that keystrip, let them have it. We need to build confidence and taking something away before a child is ready makes them feel insecure.
LESSON THREE
Finding a G and C in one 5 black key group is one thing...finding those Gs and Cs within multiple groups is something else! The children enjoy working with different mediums when working on patterning skills. Dots, erasable markers, circling groups all make doing the "same" thing seem different. We are working on getting that patterning skill so good on a keyboard that children instantly see same name notes in all the different places on the keyboard.Hand positions are still not "piano position". However, we are working on eliminating the fist! Our next song that we are going to learn, Hot Cross Buns, lends itself well to holding our hands in a "star" position, which is the next step to good hand position....have to keep remembering, one step at a time.
LESSON FOUR
It is critical that piano students are aware of "right" and "left" directions. In the video we play with a laminated arrow sheet and laminated arrows so the student can hold down the end of the arrow and spin the pointer end towards the right or left. This game works, but many other activities could be used...anything that stresses the ability to discern the two directions. Even when you are driving, say things like, "Time to take that right turn!"The main reason for using color coded fingers is for ease in learning - particularly when playing both hands in parallel. Again, the video is very visual showing that the "pink" finger is on the right side of each hand, so the pink fingers are different fingers on the hands. The only finger that is the same on both hands is the tall middle "green" finger.
Putting hands on top of one another "piggy back style" matches the finger colors. Children can also practice touching same color fingers on their legs when they are just sitting in a chair or...... Be creative so those finger colors get internalized.
In the video I mention that it may be more difficult to play songs with the left hand at this point. If you notice frustration on the part of the child when trying to play with the left hand, do not pressure the issue....just mention it once in awhile and continue learning new songs with right hand only. The young boys in the video can play with their left hands, but with difficulty, so we mainly play with right hand only at this point. It is easy to add the left hand to songs when a child has progressed through several songs and the right hand is working with ease. We want these children to feel confident.
LESSON FIVE
From Tick Tock I skipped down to Hot Cross Buns because it is played with right hand fingers 1, 2, and 3 which are easy fingers to use. In the beginning I usually describe a key then say, "Oh, it much easier to call that key D!" You can play games finding all the keys with the same name and putting something on each one like a removable sticker, color crayon, button...... Color crayons work really well with D..and then you can have them put red crayons on all the Ds since we use our red finger on D for Hot Cross Buns.Use both finger numbers and colors. As soon as a child can play with the left hand, the numbers will be different for a song, but the colors will remain the same, so both colors and numbers are important at this point. Use either when talking about a key.
Mentioning that fact that the arrow that points to the correct key on the app also has a little finger number on it makes the children pay more attention to that arrow, so when we introduce quarter, half and eight notes, they see the differences in those arrows immediately!
Calvin plays Hot Cross Buns on the video. I do have the boys play a song fairly frequently so other children can see the focus with playing on the correct key with the correct finger. The rhythm is not too far off at this point - is a coordination issue primarily.
LESSON SIX
The ACPP app vidually teaches the beginner student how to play a song. This correlates to speech. We learn speech by hearing, looking at the speaker, and trying to copy the sound. At quite a young age people start reading books to their children, so the children not only see pictures, but notice those words. We have introduced some capital key letters, but now are going a step further.When introducing anything to a young child we have to introduce it in a way they understand, adding small amounts of new information. The children really respond to quarter notes that just "walk, walk, walk..." They understand "walking". They also understand, "Wait!", so the half notes that get to "walk" then have to "wait" is also understandable to them. The eight notes that "run, run, run" are also an understandable concept, but the rhythm is generally not too accurate when they tap along the stepping sheet or beat boxes. However, we deal with this quite soon after we introduce the measures a couple lessons from now.
We also continue to emphasize the key names with tracing sheets. These tracing game sheets also emphasize following directions since I tell them exactly how to trace the letters. Sometimes it is fun as a parent or teacher to start tracing a letter, then ask the child what you are supposed to do next.
LESSON SEVEN
We are tracing again! Tactile activities help children to remember what they are learning. Having them turn one kind of note into another also emphasizes that there are subtle differences between those notes. And then there are multiple eighth notes in a row that look quite different from a single eighth note...The pointer arrows on the app are mentioned again since they also indicate quarter, half and eighth notes. After talking about this with the little boys in the video they started pointing out or saying the different types of notes as they played a song with the app...."That's a quarter note!"
We are working on piano fingers with the bubble up toy hearts. They work quite well, but tapping "tip toe" on a table top works well too. Then ask if the child can "tip toe" on the keys when playing the song, remembering that the thumb just goes up and down and touches the key with its side.
LESSON EIGHT
Music beats are introduced. The beat boxes are visual and clocks are visual so we have a way of "seeing" little spaces of time. The time signature is introduced to let the little piano students know how many "beat boxes" go into each little group of notes that we call a measure. Seeing the sets of beat boxes with their notes and gluing them onto a puzzle sheet was quite easy for the little boys.....again trying to be visual when explaining an invisable concept!From this point on, the terminology that has been introduced keeps being used, so if there seems to be confusion, back up and go through the introduction to the term again. Soon counting through the measures will be added and the beat boxes will disappear.